Installation of Django and Gunicorn
First update and upgrade the system so you are working with the latest packages;
sudo apt update && sudo apt upgrade -y
Next we will need to install all the packages we will use in NearBeach
sudo apt install python3-dev nginx curl build-essential python3-setuptools shared-mime-info libjpeg-dev zlib1g-dev
Install pip
curl https://bootstrap.pypa.io/get-pip.py -o get-pip.py
sudo python3 get-pip.py
After installing the required packages, you will need to update pip
sudo pip3 install --upgrade pip
Once pip is upgraded, you will need to create a virtual environment
sudo pip3 install virtualenv
Navigate to a directory where you would like to store your project. We would recommend /var/www/, if you require adding permission to /var/www/ please consult Ubuntu Help If you need to create your own project folder, then use the following commands
mkdir <<project_folder>>Then navigate into it
cd <<project_folder>>
Create your own virtual environment for python
virtualenv <<project_environment>>Note
Please do not use the name ‘NearBeach’ or variations of this for the Project Virtual Environment. Our recommended name would be ‘venv’
This will create a directory called “<<project_environment>>”, this will store NearBeach’s libraries for python
Activate the virtual environment using the following command
source ./<<project_environment>>/bin/activateYou terminal prompt will change to indicate that it is working in the virtual environment now. It should look like the following
(<<project_environment>>)user@computer:
Install Django along with several other required packages
pip install django gunicorn
Django and gunicorn is now installed - we will now configure the webserver to server the pages.
Create a new django project
django-admin startproject <<django_project>>Note
Please do not create a project called ‘NearBeach’ as it will conflict with the NearBeach application. Our recommened name would be ‘oceansuite’
Adjust the project’s settings to allow debugging and accept ALL allowed hosts
nano ./<<django_project>>/<<django_project>>/settings.py
Change the following lines to reflect the following

This will allow us to test the web server. We will be modifying this file later to be more security conscience
Save the settings file and exit
Test the django project can interact with gunicorn
cd ./<<django_project>>
sudo ufw allow 8000
gunicorn --bind 0.0.0.0:8000 <<django_project>>.wsgi
Now open up a new tab in your browser and go to;
https://<<your_domain_or_IP>>:8000You should see the following page load - note there will be no styling, that is fine as Gunicorn does not know how to find it.
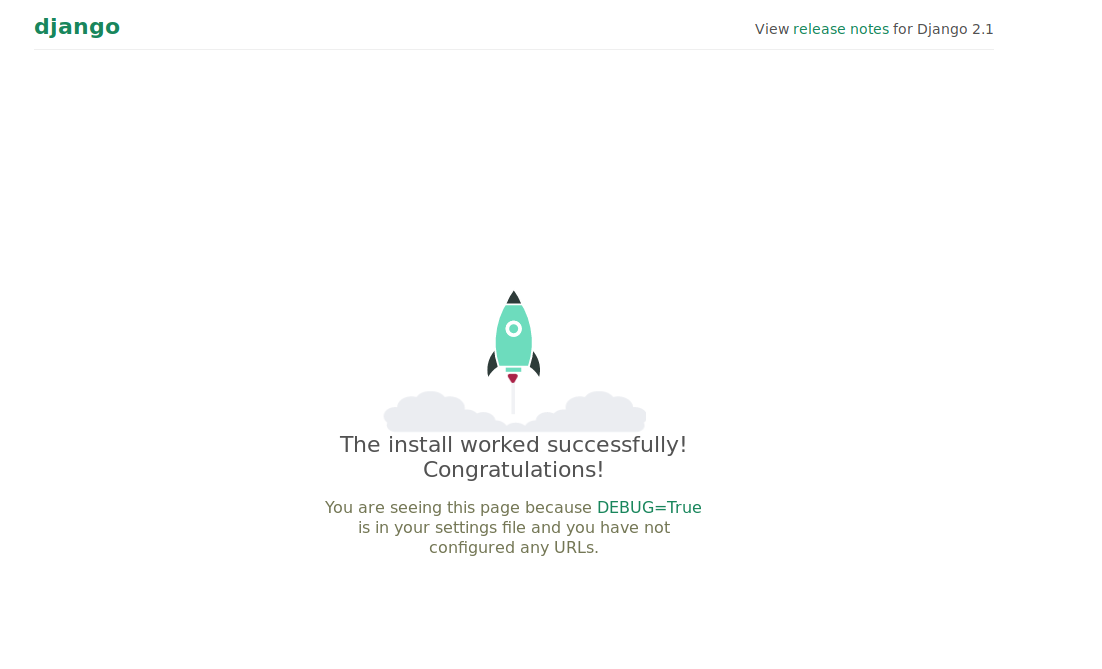
If not, please check your error logs
Installation of systemd Socket and Service files
Gunicorn will need both socket and service files to be created to run automatically when the system starts.
Edit a gunicorn.socket file
sudo nano /etc/systemd/system/gunicorn.socket
Inside the file you will need the following code
[Unit]
Description=gunicorn socket
[Socket]
ListenStream=/run/gunicorn.sock
[Install]
WantedBy=sockets.target
Save and close the file when you are finished
Edit a gunicorn.service file
sudo nano /etc/systemd/system/gunicorn.service
Inside the file you will need the following code
[Unit]
Description=gunicorn daemon
Requires=gunicorn.socket
After=network.target

[Service]
User=www-data
Group=www-data
WorkingDirectory=<<django_project_location>>
ExecStart=<<virtualenv_location>>/bin/gunicorn \
  --access-logfile - \
  --workers 3 \
  --bind unix:/run/gunicorn.sock \
  <<django_project>>.wsgi:application
[Install]
WantedBy=multi-user.target
Save the file and exit
Run and test the socket
sudo systemctl start gunicorn.socket
sudo systemctl enable gunicorn.socket
You will need to test the status of the gunicorn socket
sudo systemctl status gunicorn.socket
If gunicorn’s status is active, you will need to configure nginx to proxy pass to gunicorn
Add your project file to sites-enabled
sudo nano /etc/nginx/sites-available/<<django_project>>Copy in the following text
server
{
  listen 80;
  server_name <<your_domain_or_IP>>;
  location = /favicon.ico { access_log off; log_not_found off; }
  location /static/ { root <<django_project_location>>; }
  location / {
    include proxy_params;
    proxy_pass http://unix:/run/gunicorn.sock;
  }
}
Create a soft link
sudo ln -s /etc/nginx/sites-available/<<django_project>> /etc/nginx/sites-enabled
Test nginx
sudo nginx -tIf there are errors at this point, consult the internet for a solution, or check the logs
If no errors are reported, restart nginx
sudo systemctl restart nginx
Fix up the firewall
sudo ufw delete allow 8000
sudo ufw allow 'Nginx Full'
Edit the settings file to limit the security
nano ./<<django_project>>/settings.pyFill out the Allowed host with an appropriate value(s), and turn off debug
Restart gunicorn
sudo service gunicorn restart
More information on this install can be found on digital ocean’s documentation
Installation of Certbot
Certbot is recommended by NearBeach to supply free certified SSL certificates. Please follow the instructions found on the Certbot’s Site
Installation of XSendFile
Note
Nginx might require user to setup XSendFile, please see more information here - https://www.nginx.com/resources/wiki/start/topics/examples/xsendfile/